flowchart LR
  subgraph lp[Local]
    subgraph r[R]
      sr[sparklyr]
      rt[reticulate]
    end
    subgraph ps[Python]
      dc[Databricks Connect]
      g1[gRPC]
    end
  end
  subgraph db[Databricks]
    sp[Spark]
  end
  sr <--> rt
  rt <--> dc
  g1 <-- Internet<br>Connection --> sp
  dc <--> g1

  style r   fill:#fff,stroke:#666,color:#000
  style sr  fill:#fff,stroke:#666,color:#000
  style rt  fill:#fff,stroke:#666,color:#000
  style ps  fill:#fff,stroke:#666,color:#000
  style lp  fill:#fff,stroke:#666,color:#fff
  style db  fill:#fff,stroke:#666,color:#000
  style sp  fill:#fff,stroke:#666,color:#000
  style g1  fill:#fff,stroke:#666,color:#000
  style dc  fill:#fff,stroke:#666,color:#000
Databricks
Last updated: Tue Apr 21 08:52:28 2026
Introduction
Databricks Connect enables interaction with Spark clusters remotely. It is based on Spark Connect, which enables remote connectivity thanks to its new decoupled client-server architecture. This allows users to interact with the Spark cluster without having to run the jobs from a node. Additionally, it removes the requirement of having Java components installed on the user’s machine.
The API is very different from “legacy” Spark and using the Spark shell is no longer an option. We have decided to use Python as the new interface. In turn, Python uses gRPC to interact with Spark.
sparklyr communicates with Databricks Connect
We are using reticulate to interact with the Python API. sparklyr extends the functionality, and user experience, by providing the dplyr back-end, DBI back-end, and integration with RStudio’s Connection pane.
In order to quickly iterate on enhancements and bug fixes, we have decided to isolate the Python integration into its own package. The new package, called pysparklyr, is an extension of sparklyr.
Package Installation
To access Databricks Connect, you will need the following two packages:
sparklyrpysparklyr
install.packages("sparklyr")
install.packages("pysparklyr")
Setup credentials
To use with Databricks Connect, in runtime 13 or above, you will need three configuration items:
- Your Workspace Instance URL
- Your Cluster ID
- Your credentials
There are several options to obtain your credentials. Choose one of the following, presented in order of recommendation:
If connecting from Posit Workbench, the administrator can set your company’s instance to automatically obtain the credentials for you, and your team. Please see the next section for more information.
If connecting to a Microsoft Azure host, you can use the Azure CLI, or the integration with Azure Active Directory via Single-Sign-On. You will need to specify other pieces of information, such as Resource ID. For more information see Azure native authentication
If connecting to an Amazon Web Services (AWS) host, you should be able to use your username and password to authenticate (basic authentication)
The next option is to obtain a Personal Access Token (PAT), which will act as both your “user ID”, and your “password” to gain access. See the Databricks docs to find out how to obtain a PAT
How do I actually “set” my credentials? There are two options to provide your credential information (PAT, Host, user name, Resource ID, etc.):
Set environment variables in your R session. There are some best practices to set those variables found in the Environment Variables section
Create and use a Databricks Configuration Profile file (.databrickscfg).
For more information about how Databricks Authentication works, as well as the specific variable names to use see the Authentication page.
Posit Workbench
Posit Workbench can manage Databricks credentials on behalf of the user. For users of Posit Workbench, this is the recommended approach to setting up credentials as it provides an additional layer of security. If you are not currently using Posit Workbench, feel free to skip this section.
Details on how to set up and configure the Databricks integration can be found here.
Environment Variables
Environment variables work well, because they rarely vary between projects. What usually changes more often is the cluster you are connecting to. Using environment variables also makes connection safer, because token contents will not be in your code in plain text. We recommend that you set these two variables at your user level. To do this run:
usethis::edit_r_environ()That command will open a text file that controls the environment variables at the user level. If missing, insert the required entries on the file and save. Here is an example of the two that are required if using a PAT to connect:
DATABRICKS_HOST="Enter here your Workspace URL"
DATABRICKS_TOKEN="Enter here your personal token" # Not needed if using Posit Workbench
This is a one time operation. After saving and closing the file, restart your R session.
First time connecting
After setting up your Host and Token environment variables, you can now connect to your cluster by simply providing the cluster’s ID, and the method to spark_connect():
library(sparklyr)

sc <- spark_connect(
  cluster_id = "Enter here your cluster ID",
  method = "databricks_connect"
)
In order to connect and interact with Databricks, you will need a specific set of Python libraries installed and available. To make it easier to get started, we provide functionality that will automatically do the following:
Create or re-create the necessary Python environment
Install the needed Python libraries into the new environment.
In a new environment, the first-time installation will take some time. Under the hood, reticulate is downloading, or selecting, the correct version of Python, and downloading the Python libraries. After connecting for the first time, the session should start much faster, since all of the needed Python components are now downloaded and cached.
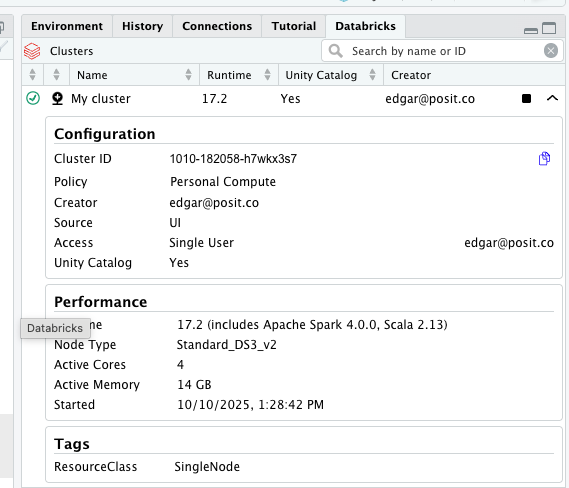
Posit Workbench’s ‘Databricks Pane’
Posit Workbench provides users with a Databricks pane for direct access to available Databricks clusters. From this pane, users can view details about Databricks clusters and connect directly to them.
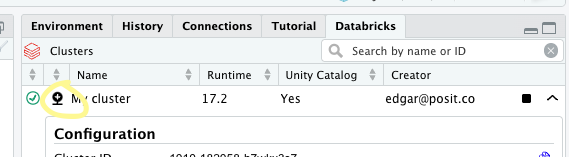
To connect to the cluster, click on the ‘connection’ icon situated to the left of its name (circled in yellow below).
Clicking on the icon will open the connection snippet. It will have the cluster’s ID already populated, as well as the Host URL. In the background, the snippet will automatically get the information from the cluster, such as its DBR version.
The snippet will apply the following logic to recommend the Python virtual environment to use:
- If there is a
reticulateVirtual Environment previously created viainstall_databricks()that matches the DBR version of the cluster. - If there is a project level
.venvfolder - If there is a
.venvfolder available at the home directory level - Create a temporary Virtual Environment using
uv
The recommendation appears on the ‘Python Env’ drop down.
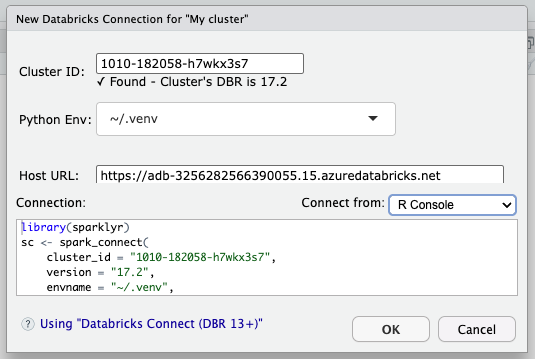
The drop down will include an option to let {reticulate} choose the Python environment. The way reticulate chooses an environment is found here: Order of Discovery. Another option available is the one to create the temporary UV environment. Additional options appear based on whatever applies from the first three options in the list above. All three could appear if there is a virtual environment that matches the DBR version of the cluster, and there are .venv folders at the project and home directory, but only one will be automatically selected.
Important: Using install_databricks() or letting pysparklyr create the temporary UV environment, pysparklyr will make sure to install the correct Python packages needed to work with the cluster. But selecting let {reticulate} choose the Python environment or a .venv environment does not install any Python packages, it assumes that the user has already prepared the Python environment.
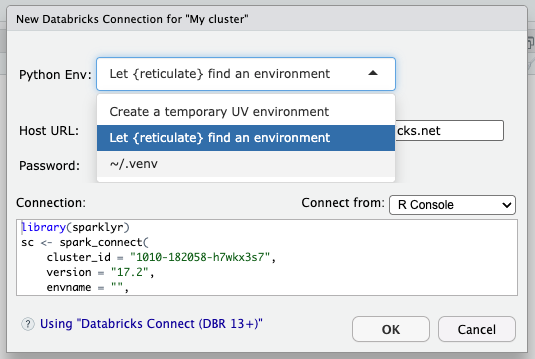
The snippet modifies the envname argument in spark_connect() based on the final selection. The resulting code can later be modified if needed. For example, if a specific Python environment is needed which was not identified by the snippet, then the envname of the code can be modified after pressing ‘OK’.
More details about this feature can be found in Posit Workbench’s official user guide.
Serverless Compute
Databricks’ Serverless compute lets you run workloads without having to provision a cluster. Databricks takes care of managing the resources.
To use with sparklyr, set the serverless argument to TRUE. And make sure to pass the version of the DBR you will connect to. sparklyr will use the value from version to determine which version of the databricks-connect Python project will be used for the session:
library(sparklyr)

sc <- spark_connect(
  cluster_id = "Enter here your cluster ID",
  method = "databricks_connect",
  serverless = TRUE,
  version = "`databricks-connect` version to use"
)
Known Limitations
spark_apply()is not supported - There is no R installation in the serverless environment.Due to caching limitations, no data can be persisted in memory during the Spark session. In practical terms, the
memoryargument in anysparklyrfunction will not work if set toTRUE. Thecompute()function will not work.
Please refer the General Limitations section in this page for more background.
Interacting with the cluster
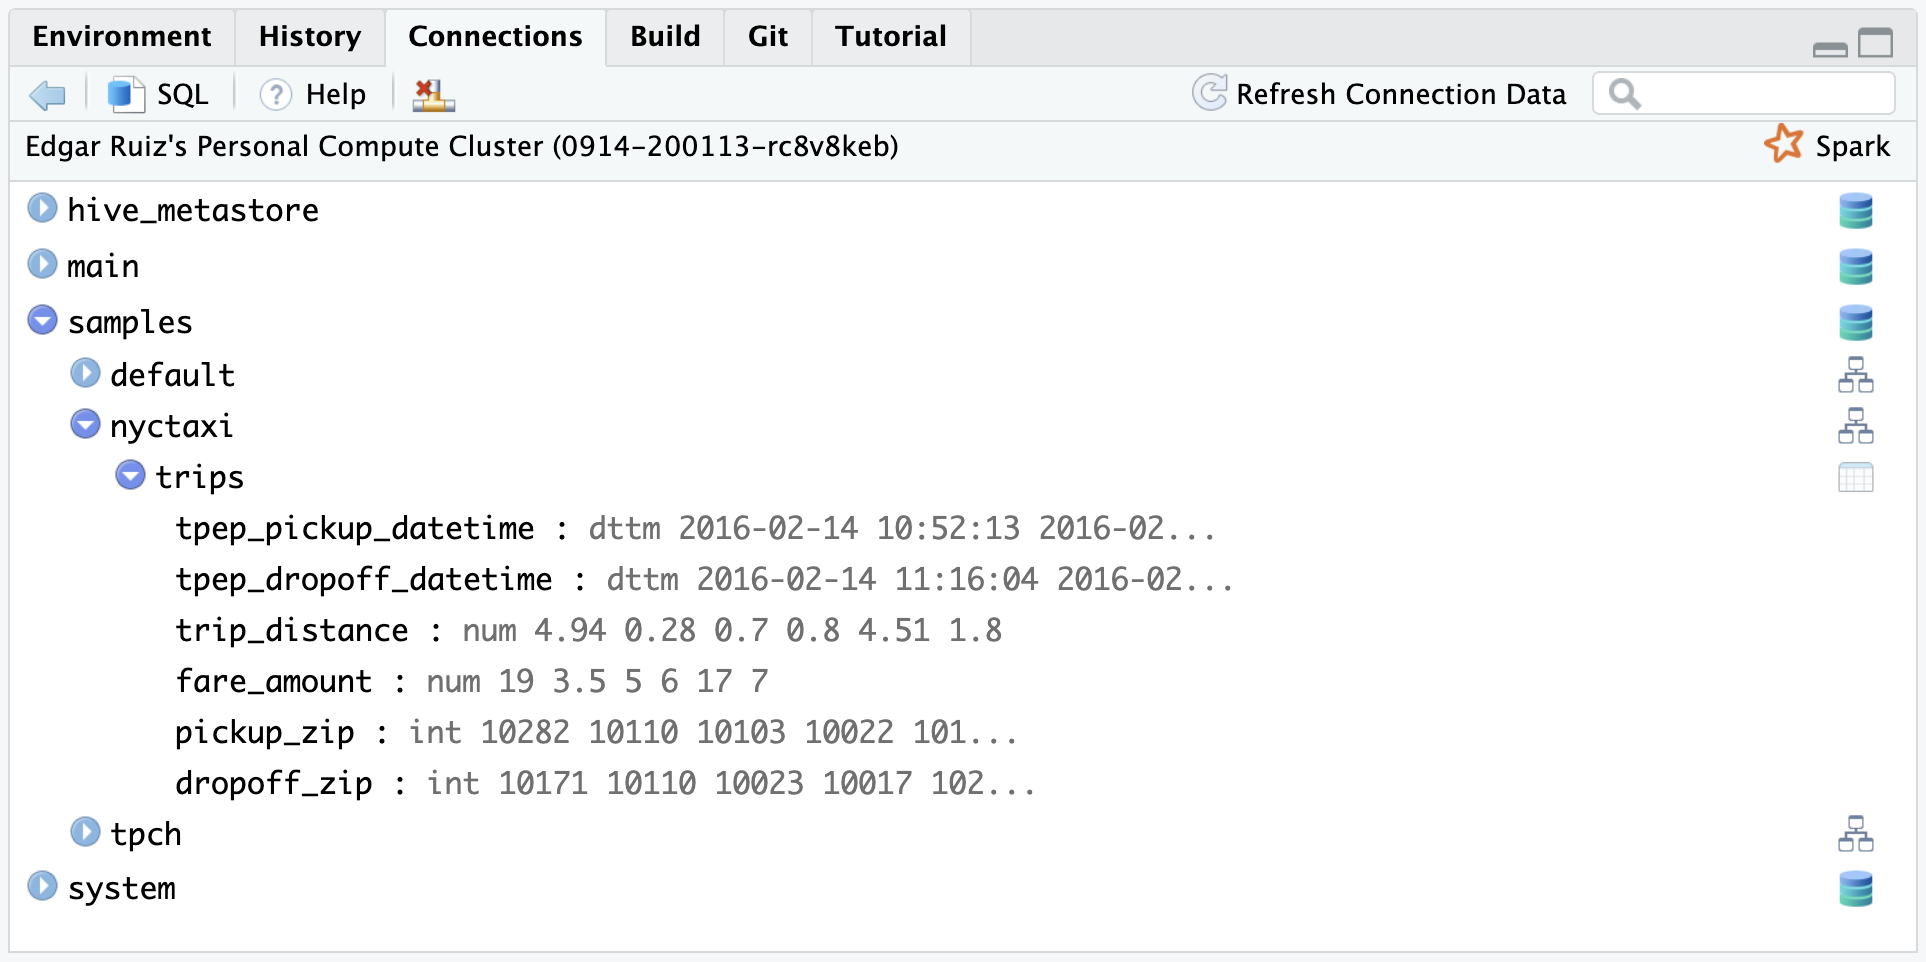
Connections pane
Thanks to the new way we are integrating with Spark, it is now possible to display the same structure displayed in the Databricks Data Explorer. In Databricks, the current data structure levels are:
- Catalog
- Database
- Table
- Database
In the RStudio Connections Pane, you can navigate the data structure by expanding from the top level, all the way down to the table you wish to explore. Once expanded, the table’s fields and their types are displayed.
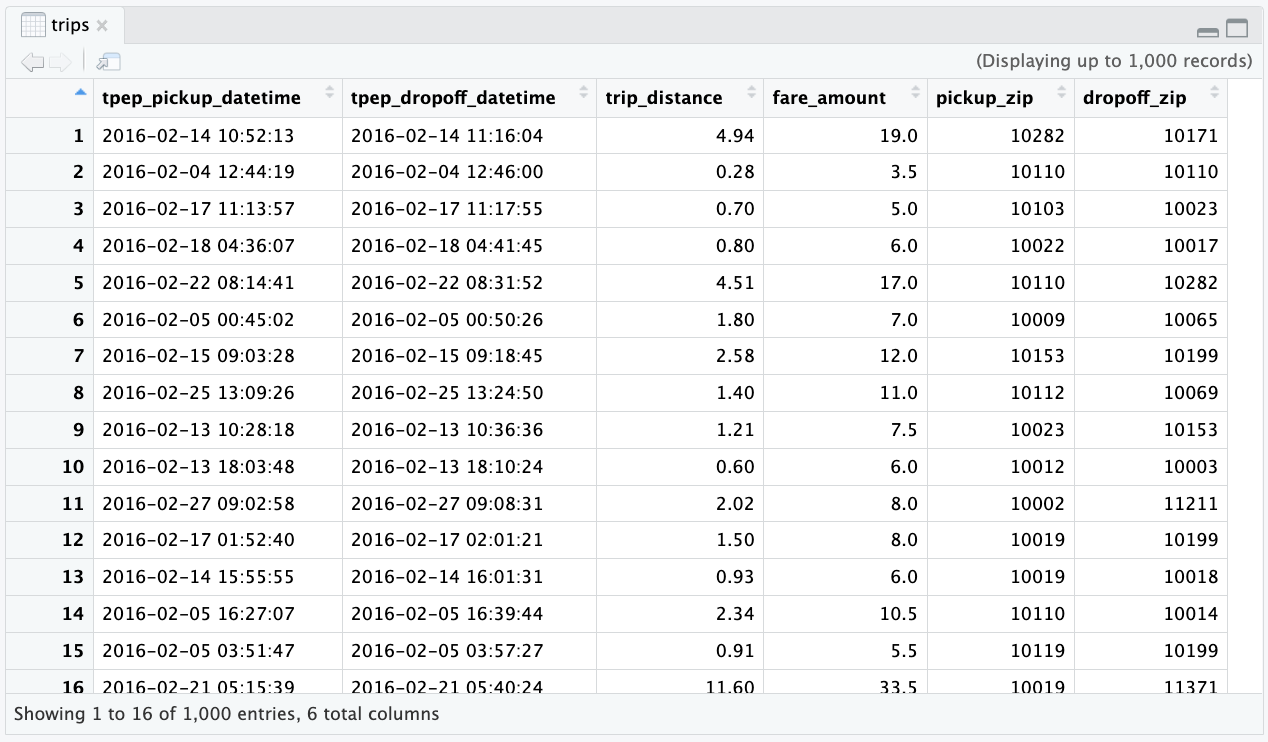
You can also click on the table icon, situated to the right of the table name, to preview the first 1,000 rows:
Using the Connection to Access Data
library(dplyr)
library(dbplyr)
library(sparklyr)

sc <- spark_connect(
    cluster_id = "0420-225150-twe7n5s0",
    method = "databricks_connect"
)
#> ℹ Retrieving info for cluster:'0420-225150-twe7n5s0'
#> ✔ Cluster: '0420-225150-twe7n5s0' | DBR: '18.1' [465ms]
#>
#> ℹ
#> ✔ Python environment: 'Managed `uv` environment' [1.5s]
#>
#> ℹ Connecting to 'DBR 18.1 - Personal Compute'
#> ✔ Connected to: 'DBR 18.1 - Personal Compute' [17ms]
#>
After connecting, you can use dbplyr’s in_catalog() function to access any table in your data catalog. You will only need to pass the respective names of the three levels as comma separated character entries to in_catalog() in this order: Catalog, Database, and Table.
Here is an example of using tbl() and in_catalog() to point to the trips table, which is inside nyctaxi database, which is inside the samples catalog:
trips <- tbl(sc, in_catalog("samples", "nyctaxi", "trips"))

trips
#> # Source:   table<`samples`.`nyctaxi`.`trips`> [?? x 6]
#> # Database: spark_connection
#>    tpep_pickup_datetime tpep_dropoff_datetime trip_distance fare_amount
#>    <dttm>               <dttm>                        <dbl>       <dbl>
#>  1 2016-02-13 15:47:53  2016-02-13 15:57:15            1.4          8
#>  2 2016-02-13 12:29:09  2016-02-13 12:37:23            1.31         7.5
#>  3 2016-02-06 13:40:58  2016-02-06 13:52:32            1.8          9.5
#>  4 2016-02-12 13:06:43  2016-02-12 13:20:54            2.3         11.5
#>  5 2016-02-23 04:27:56  2016-02-23 04:58:33            2.6         18.5
#>  6 2016-02-12 18:41:43  2016-02-12 18:46:52            1.4          6.5
#>  7 2016-02-18 17:49:53  2016-02-18 18:12:53           10.4         31
#>  8 2016-02-18 14:21:45  2016-02-18 14:38:23           10.2         28.5
#>  9 2016-02-03 04:47:50  2016-02-03 05:07:06            3.27        15
#> 10 2016-02-18 19:26:39  2016-02-18 19:40:01            4.42        15
#> # ℹ more rows
#> # ℹ 2 more variables: pickup_zip <int>, dropoff_zip <int>
After pointing tbl() to that specific table, you can then use dplyr to execute queries against the data.
trips |>
  group_by(pickup_zip) |>
  summarise(
    count = n(),
    avg_distance = mean(trip_distance, na.rm = TRUE)
  )
#> # Source:   SQL [?? x 3]
#> # Database: spark_connection
#>    pickup_zip count avg_distance
#>         <int> <dbl>        <dbl>
#>  1      10468     2        0.545
#>  2      10032    15        4.49
#>  3      10013   273        2.98
#>  4      10022   519        2.00
#>  5      10162   414        2.19
#>  6      10018  1012        2.60
#>  7      11106    39        2.03
#>  8      11237    15        3.31
#>  9      10011  1129        2.29
#> 10      11103    16        2.75
#> # ℹ more rows
Machine Learning
Machine Learning capabilities are currently available starting with Databricks Runtime version 14.1. Compared to “legacy” Spark, Spark Connect’s ML capabilities are limited. At this time, there is only one supported model, Logistic Regression, and two scaler transformers, namely Standard Scaler and Max Abs Scaler. sparklyr makes that functionality available.
Using for the first time
By default, the Python environment that sparklyr creates does not include libraries that relate to Machine Learning. These include Torch and “scikit-learn”. Some of the libraries are large in size and they may have Python requirements that are challenging to new users. Additionally, we have noticed there are not many users that need to utilize ML capabilities at this time.
The first time an ML function is accessed through sparklyr, you will be prompted to install the additional Python libraries which are needed to access such ML capabilities.
ml_logistic_regression(tbl_mtcars, am ~ .)
#> ! Required Python libraries to run ML functions are missing
#>   Could not find: torch, torcheval, and scikit-learn
#>   Do you wish to install? (This will be a one time operation)
#>
#> 1: Yes
#> 2: Cancel
#>
#> Selection: 1
#> Using virtual environment '/Users/edgar/.virtualenvs/r-sparklyr-databricks-18.1' ...
#> + /Users/edgar/.virtualenvs/r-sparklyr-databricks-18.1/bin/python -m pip install --upgrade --no-user torch torcheval scikit-learn
#> Collecting torch
...
Note
It is possible to install the ML libraries along with the required libraries. There may be several reasons to do this, including trying to recreate the environment after upgrading Python in your machine. Just pass install_ml=TRUE to the installation function:
install_databricks(cluster_id = "Enter your cluster's ID", install_ml = TRUE)or
install_databricks(version = "14.1", install_ml = TRUE)Easily fit and use
At this time, Logistic Regression is the only model supported. As usual, there are specific data preparation steps in order to run. sparklyr automates those steps, so all you have to do is pass the Spark data frame and the formula to use:
tbl_mtcars <- copy_to(sc, mtcars)
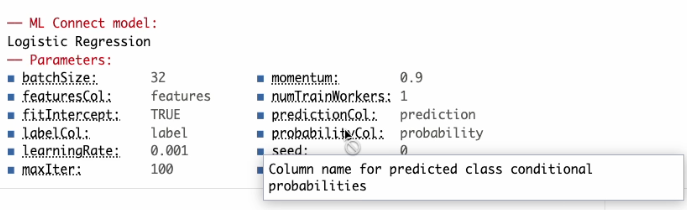
model1 <- ml_logistic_regression(tbl_mtcars, am ~ .)The output for Spark Connect based models has been upgraded. It will display the model parameters.
As shown in the following screenshot, the new output features a first-of-its-kind tooltip, it will popup the description of the parameter when hovered over. This functionality works when used in RStudio, and any console that supports this kind of enhanced user experience.
To use the model, you can run ml_predict():
ml_predict(model1, tbl_mtcars)Using feature transformers
These are the two feature transformers currently supported:
- Standard Scaler -
ft_standard_scaler() - Max Abs Scaler -
ft_max_abs_scaler()
To access the scalers, first use ft_vector_assembler() to combine the input columns into a single feature vector, then pass that vector column to the scaler.
tbl_mtcars <- copy_to(sc, mtcars)

tbl_mtcars |>
  ft_vector_assembler(c("wt", "mpg"), "features_raw") |>
  ft_standard_scaler("features_raw", "features") |>
  select(wt, mpg, features)
#> # Source:   SQL [?? x 3]
#> # Database: spark_connection
#>       wt   mpg features
#>    <dbl> <dbl> <list>
#>  1  2.62  21   <pyspark.ml.linalg.DenseVector>
#>  2  2.88  21   <pyspark.ml.linalg.DenseVector>
#>  3  2.32  22.8 <pyspark.ml.linalg.DenseVector>
#>  4  3.22  21.4 <pyspark.ml.linalg.DenseVector>
#>  5  3.44  18.7 <pyspark.ml.linalg.DenseVector>
#>  6  3.46  18.1 <pyspark.ml.linalg.DenseVector>
#>  7  3.57  14.3 <pyspark.ml.linalg.DenseVector>
#>  8  3.19  24.4 <pyspark.ml.linalg.DenseVector>
#>  9  3.15  22.8 <pyspark.ml.linalg.DenseVector>
#> 10  3.44  19.2 <pyspark.ml.linalg.DenseVector>
#> # ℹ more rows
When you are done with your queries and computations, you should disconnect from the cluster.
spark_disconnect(sc)Environments
Install different version of databricks.connect
Here are three different options to create a custom Python environment, that will contain the needed Python libraries to interact with Databricks Connect:
-
To install the latest versions of all the needed libraries, use:
pysparklyr::install_databricks()sparklyrwill query PyPi.org to get the latest version ofdatabricks.connectand installs that version. -
It is recommended that the version of the
databricks.connectlibrary matches the DBR version of your cluster. To do this, pass the DBR version in theversionargument:pysparklyr::install_databricks("14.0")This will create a Python environment and install
databricks.connectversion 14.0, and it will automatically name itr-sparklyr-databricks-14.0. By using this name,sparklyris able to know what version ofdatabricks.connectis available inside this particular Python environment. -
If you are not sure about the version of the cluster you want to interact with, then use the
cluster_idargument. We have added a way to pull the cluster’s information without starting Spark Connect. This allows us to query the cluster and get the DBR version:pysparklyr::install_databricks(cluster_id = "[Your cluster's ID]")
Restricted Python environments
If your organization restricts Python environment creation, you can point sparklyr to the designated Python installation. To do this, pass the path to the environment in the envname argument of spark_connect():
library(sparklyr)

sc <- spark_connect(
  method = "databricks_connect",
  cluster_id = "Enter here your cluster ID",
  envname = "Enter here the path to your Python environment"
)
To successfully connect to a Databricks cluster, you will need to match the proper version of the databricks.connect Python library to the Databricks Runtime (DBR) version in the cluster. For example, if you are trying to use a Databricks cluster with a DBR version 14.0 then databricks.connect will also need to be version 14.0. Failure to do so can result in instability or even the inability to connect.
Besides databricks.connect, the Python environment will also need to have other Python libraries installed. The full list is in the Python Libraries section.
Important
If your server, or machine, has only one Python installation and no ability to create Conda or Virtual environments, then you will encounter issues when connecting to a Databricks cluster with a mismatched version of databricks.connect to DBR.
Important - This step needs only to be done one time. If you need to connect to a different cluster that has the same DBR version, sparklyr will use the same Python environment. If the new cluster has a different DBR version, then it is recommended that you run the installation function using the new DBR version or cluster ID.
Python Libraries
Here is the list of the Python libraries needed in order to work with the cluster:
Required libraries:
databricks-connectdelta-sparkpandasPyArrowgrpciogoogle-api-python-clientgrpcio_status
ML libraries (Optional):
torchtorchevalscikit-learn
To enable R User Defined Functions (UDFs):
-
rpy2(see Run R code in Databricks)
What is supported
Here is a list of what we currently support, and do not support via sparklyr and Databricks Connect:
Supported:
- Integration with most of the
dplyr, andDBI, APIs - Integration with the
invoke()command - RStudio Connections Pane navigation
- Support for Personal Access Token security authentication for Databricks Connect
- Support for most read and write commands. These have only been tested in Spark Connect.
Not supported:
SDF functions - Most of these functions require SparkSession, which is currently not supported via Spark Connect.
tidyr- This is ongoing work that we are focusing on insparklyr. We are implementing these functions using PySpark DataFrame commands instead of depending on the Scala implementation.